Contact Us

Use the form on the right to contact us.

You can edit the text in this area, and change where the contact form on the right submits to, by entering edit mode using the modes on the bottom right. 

367 North Main Street
Milford Charter Township, MI, 48381

248.684.1373

Acorn Farm opened its doors in downtown Millford in 2008. Since then, we’ve had the pleasure of meeting the most kind, interesting, generous, and downright fun people in the store every single day. Our staff is made up of former customers who became a part of our family so much that we just had to hire them! At Acorn Farm our goal is to not only provide you with high quality goods for your kitchen and home, but to stir up your imagination in the kitchen and around the home. We aim to make every trip to Acorn Farm a pleasant one, and that you’ll always leave encouraged, inspired, and ready to try something new.  

RECIPE ARCHIVE IV

Filtering by Tag: basil

Grilled Nectarine and Chicken Salad

Lia Soneson

GrilledSalad_v3_01.jpg

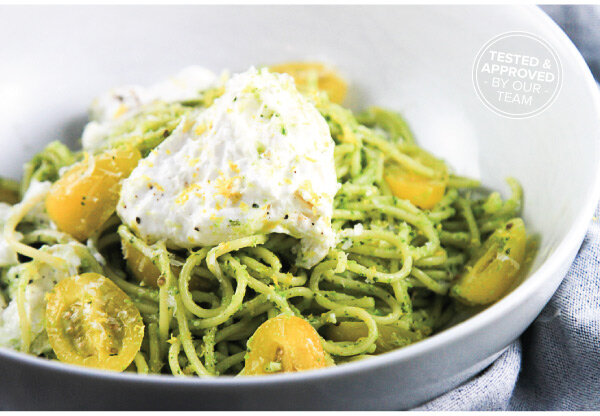
Try this truly satisfying summer salad! Grilled chicken and nectarine halves perfectly complement the crispy crunch of fresh greens. Creamy goat cheese, bright blueberries, and a homemade, herbed buttermilk dressing seal the deal for this wonderful meal!


Grilled Nectarine and Chicken Salad with an Herbed Buttermilk Dressing
Serves 4

Salad Ingredients:
2 large chicken breasts, about 1 lb boneless, thinly sliced (or 4 thinly-cut chicken breasts)
4 nectarines, halved and grilled
6 oz spring mix of spinach and arugula
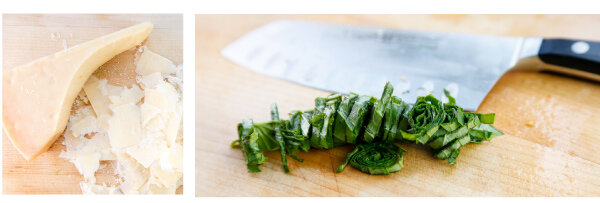
4 oz goat cheese, crumbled into bite-sized pieces
1 cup blueberries, washed
1/4 small red onion, thinly sliced

Chicken Marinade:
1 teaspoon Kosher salt
1/2 teaspoon black pepper
1/2 teaspoon garlic powder
1/2 teaspoon dried basil
1/2 teaspoon dried oregano
1/4 teaspoon paprika
2 tablespoons olive oil
2 tablespoons fresh lemon juice

Herbed Buttermilk Dressing:
1 clove garlic, grated
1 tablespoon fresh parsley, minced
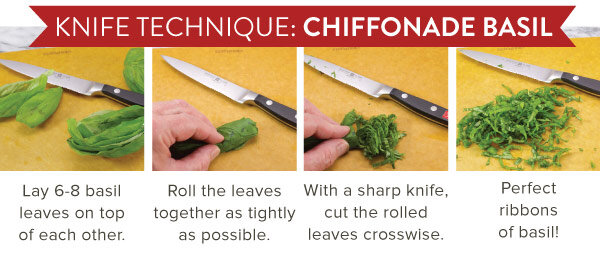
1 tablespoon fresh basil, minced (8-10 leaves)
1 tablespoon chives, sliced
1/2 cup buttermilk
1/2 cup Greek yogurt
2 tablespoons olive oil
2 tablespoons lemon juice
1 tablespoon white wine vinegar
1 teaspoon Kosher salt
1/2 teaspoon black pepper
1/4 teaspoon garlic powder
1 teaspoon sugar

Directions:
1. Prepare the chicken breasts by thinly slicing in half to make thinner breasts for more flavor and faster grilling. Marinate the chicken in a large bowl. Rub the chicken on all sides with Kosher salt, pepper, garlic powder, basil, oregano, and paprika. Drizzle with olive oil and lemon juice. Cover and refrigerate the chicken; marinate for 30 minutes or up to 1 hour.

2. Prepare the herbed buttermilk dressing. Peel and grate the garlic using a fine grater. Wash the parsley, basil, and chives and chop finely. In a medium-sized glass bowl, whisk the buttermilk and Greek yogurt together until well combined. Add the olive oil, lemon juice, Kosher salt, pepper, garlic powder, and sugar; mix well. Whisk in the grated garlic and chopped herbs until evenly incorporated.

3. Prepare the nectarines for grilling by washing, and slicing in half. Carefully remove the pit with a paring knife. Brush each half with olive oil.

4. Fire up the grill! When using a gas grill, prepare half of the grill with high heat while keeping the other half on low heat -- that is, use a direct/indirect set-up. Add the chicken to the cooler side of the well-oiled grill and close the lid. After 4-5 minutes, turn once and cook an additional 4-5 minutes. Continue to grill and flip, as needed, until the thickest part of the breast reaches 160°F. After removing the chicken from the grill, the heat in the chicken breast will continue to rise until it hits the food-safe temperature of 165°F. Let the chicken rest for 5 minutes, then cut into slices.

5. Grill the nectarine halves flesh-side down over medium-high heat for 3 to 4 minutes or until grill marks appear.

6. Assemble the salad! Layer the greens and red onion with a drizzle of the herbed buttermilk dressing. Top the salad with the grilled chicken slices, grilled nectarine halves, goat cheese crumbles, and blueberries. Garnish with fresh chives, if desired.

Grilled Flatbread

Lia Soneson

Grilled-Flatbread_V2_01a.jpg

Meat and veggies aren't the only thing to make on the grill -- try something new with our grilled flatbread! Puffy, with a delightful crackle on the exterior, grilled flatbread is different from a traditional pizza crust, but no less delicious. For this recipe, we’ve topped our flatbread with melty mozzarella, spicy garlic, and piled it high with fresh-from-the-garden salad.

Grilled Flatbread - with an Arugula, Tomato, & Basil Salad
Serves 2

Flatbread Ingredients:
1 cup lukewarm water
1 packet instant yeast
1 teaspoon honey
1 teaspoon Kosher salt
2-1/2 cups all-purpose flour, plus more for dusting and kneading
1 tablespoon olive oil, plus 1 tbsp olive oil for brushing crust
2 cloves garlic, thinly sliced
4-6 ounces fresh mozzarella cheese, thinly sliced

Salad Topping Ingredients:
4 cups arugula, washed
1/4 cup shaved Parmesan Reggiano
10 oz ripe cherry tomatoes, halved
1/2 small red onion, thinly sliced
6 leaves fresh basil, sliced chiffonade style

Salad Dressing Ingredients:
1 tablespoon freshly squeezed lemon juice
1/2 shallot, minced
3 tablespoons olive oil
1/2 tablespoon balsamic vinegar
1/4 teaspoon Kosher salt
1/4 teaspoon black pepper

Directions:
1. Prepare the dough. Add the yeast to warm water, and proof for 2 minutes (until a few bubbles begin to appear). Then add in the olive oil, honey, salt, and one cup of the flour. Mix together, and then slowly add in the remaining flour; mix until a rough dough ball is formed. Transfer the dough to a floured surface. With the heel of your hand, knead the dough, adding flour as necessary to keep it from sticking. Knead until the dough turns into a smooth ball; place in an oiled bowl. Cover the bowl with a towel and let rise at room temperature until doubled in size, about 1 hour.

2. Meanwhile, prep the salad ingredients. Wash the arugula, shave the Parmesan, halve the tomatoes, and finely slice the red onion. Chiffonade the basil by stacking individual basil leaves, rolling them all together, then thinly slice them into ribbons.

3. whisk together the salad dressing ingredients. Cover and refrigerate.

4. Once the dough has doubled in size, prepare a direct/indirect grill, with high heat on one side.

5. Divide the dough into 2 equal portions. On a floured surface, pat each piece into a circle, about 12" in diameter. Prepare 2 parchment-lined baking sheets. Brush the parchment with a little olive oil, then place the two crusts on the parchment. Brush the top of the crusts with a little more olive oil.

6.Once the grill is hot, work quickly to grill the dough. Use the parchment paper to lift the crust, turn it over onto the grill and remove the parchment from the top of the dough. Close the lid and grill the dough for 4-5 minutes until dough begins to flu and brown slightly. Then, carefully use long tongs or a large grill spatula, flip the dough and place over indirect heat.

7. Brush the grilled side of the crust with olive oil, sprinkle with the garlic and fresh mozzarella slices. Cover and grill for another 5-10 minutes, or until the cheese has melted. Watch closely and check often to make sure the flatbread doesn't burn. Remove the cheesy flatbread from the grill and get ready to top it with the salad.

8. In a large bowl, use tongs to toss the salad in the dressing until coated. Top the grilled flatbread with the salad, sprinkle with additional salt and pepper and enjoy immediately.

Pea Pesto Pasta

Lia Soneson

Pea_Pesto_v2_01a.jpg

A good pasta dish can transform everyday ingredients into something extraordinary any day of the week. Springtime flavors inspire this fresh take on pasta. We think your family will love this super-quick, spring pea pesto pasta dish. Buon appetito!

Spring Pea Pesto Pasta
Serves 4

Spring Pea Pesto Ingredients:
1/2 cup frozen peas
1/4 cup Parmesan cheese
1/2 teaspoon Kosher salt
1/4 teaspoon freshly ground black pepper
1/4 teaspoon crushed red pepper flakes
1/2 cup olive oil
1/2 cup packed fresh basil leaves
1 tablespoon packed fresh mint leaves
juice of 1/2 lemon (about 2 tablespoons)
1 small clove fresh garlic

Pasta:
1 lb thin spaghetti

Garnish:
1 pint Sun Gold tomatoes, halved
8 oz burrata cheese
Mint leaves, chiffonade
Basil leaves, chiffonade
Lemon zest

Directions:
1. Gather all of the pesto ingredients together. Be sure to thoroughly wash all of the fresh herbs! Pulse the pesto ingredients together in a food processor. Taste test the pesto, and adjust the salt and pepper accordingly. If needed, add more olive oil for a thinner consistency. Enjoy pesto immediately, or keep covered and refrigerated (or even frozen) until ready to use.

2. Slice the tomatoes in half with a small paring knife. Roll the basil and mint leaves and cut in a chiffonade cut for a garnish.

3. Cook the pasta according to the package instructions. Drain, reserve about 1 cup of the pasta cooking water. For better pasta, salt the water! The cooking water should be “like the sea” – start with about 1 teaspoon coarse kosher salt per quart of water. This seems like a lot of salt, and it is, but most of this will be discarded when the pasta is drained. Test the pasta frequently as it approaches completion. Pasta should be cooked to al dente – “to the tooth” – tender, yet chewy, not at all mushy. The easiest way to check for doneness, is to remove a piece of pasta and test between your teeth. Or, cut a piece of test pasta, and check the cross section view. The smallest white dot, or white line at the center of the pasta piece indicates doneness is nearly at hand.

4. Mix the pesto with the drained and cooked pasta, stir with tongs until the pasta is well-coated with the pesto. Add reserved pasta water, to thin the sauce, if needed. 5. Garnish the pasta with the tomato halves, pieces of fresh burrata, mint, and basil leaves. Enjoy!

Deep Dish Pizza

Lia Soneson

DeepDishZa_v2_01.jpg

Who doesn’t love pizza??? Tonight it’s deep dish pizza on the menu! This deep dish version of pizza is inspired by a few unique pizza places that feature a partial cheese crust. Inside, delicious layers of flavor are assembled into some sort of pizza heaven. Fresh dough is topped with a layer of cheese, red onions, a robust red sauce, and finally, a hearty serving of spicy sausage - one slice is nearly enough!

Deep Dish Pizza - Sausage & Red Onion with a Crispy, Caramelized, Cheesy Crust
Makes two 12-inch deep dish pizzas - Serves 8

Dough Ingredients:
3/4 cup warm water
2-1/4 teaspoons (or one packet) yeast
1 tablespoon sugar
1 teaspoon kosher salt
2 tablespoons olive oil
2 tablespoons butter, melted
2-1/2 cups all-purpose flour

Pizza Toppings:
1 lb low-moisture mozzarella cheese, sliced in 1/8"-thick slices
8 ounces parmesan cheese, shredded
1 pound sausage, roughly rolled into 1" bite-sized discs
1/2 red onion, thinly sliced

Sauce Ingredients:
2 cloves garlic, minced
2 tablespoon olive oil
1 (28 oz) can petite diced tomatoes
1 (14oz) can crushed tomatoes
1 (6 oz) can tomato paste
2 teaspoons dried basil
2 teaspoons dried oregano
1 teaspoon dried marjoram
1/4 teaspoon fresh ground pepper
1 teaspoon Kosher salt
1 tablespoon sugar

Directions:
1. Prepare the pizza dough by hand or by using a stand mixer. Pour the warm water into a large bowl, and add the yeast. Stir slowly for about two minutes, then add the sugar, salt, olive oil, and melted butter and stir again until combined. Add 1 cup of flour, and stir until combined. Slowly add the remaining 1-1/2 cup of flour until a dough ball has formed. Knead the dough several times until a smooth ball has developed. Cover the dough with a damp cloth and let the dough rise in a warm location for about 1-1/2 hours.

2. Meanwhile, prepare the sauce. Sauté the garlic with the olive oil, stirring until fragrant. Be sure to watch this step carefully so that the garlic doesn't burn! Once the garlic is fragrant, add the diced tomatoes, crushed tomatoes, tomato paste, basil, oregano, marjoram, pepper, salt, and sugar. Bring the sauce to a low simmer and cook stirring as needed for 40-45 minutes or until the sauce has thickened nicely.

3. Use two well-seasoned 12" cast iron pans or deep dish pizza pans. Cover the surface with a generous layer of canola oil on the bottom and sides. Press the dough into the cast iron as a single flat layer and let the dough rise for an additional 30 minutes in the pan. (You can freeze half the ingredients for later.)

4. Preheat the oven to 500 degrees F.

5. Once the dough has risen in the pan, it's time to assemble the pizza. Make a layer of folded mozzarella slices all along the edge of the pan creating a "cheese crust" and then continue to layer on top of the layer of dough. Add the shredded parmesan on top of the mozzarella.

6. Spread the sliced red onions around the pizza on top of the cheese layers.

7. Add a hefty layer of pizza sauce to the pizza covering the onions completely.

8. Finally, top with pizza with the sausage discs.

9. Line a large baking sheet with aluminum foil to place on the oven rack directly below the pizza to catch any drips as the pizza cooks. Turn on a ventilation fan, and perhaps even crack a window. Any cheese that spills over will make a bit of a smoke.

10. Tent a loose piece of aluminum foil over the pizza. Bake for 20 minutes.

11. Check to make sure that the drip pan is correctly aligned to catch any spillage and continue baking for an additional 20-25 minutes or until the pizza crust is well set, the sausage is cooked, and the sauce and cheese below are bubbling hot. The sides of the crust that are made of cheese might look blackened, but they should not taste burnt, instead they will taste of delightful caramelized cheese and help to hold all of the ingredients in place.

12. Let the pizza cool slightly, enough to slide it from the pan onto a parchment paper-lined cutting board. Cut the pizza into slices with a sharp cook's knife working from the cheesy edge into the middle.

13. Pace yourself when enjoying - one pizza is hearty! One 12-inch pizza serves 4 hungry adults.

Try Our Grilled Corn and Quinoa Summer Salad

Lia Soneson

CornSalad_v1_01.jpg

Two grains, corn and quinoa, share an ancient history as important crops in the developing Americas. IN THIS ISSUE, we’ve made them the cornerstone of a salad that’s hearty, and nutritionally balanced enough to be the main entrée. Grilled sweet corn only gets tastier with the addition of healthy quinoa, summer-ripe tomatoes, fresh basil, and a bright lemony vinaigrette.

Easy Pasta Dinners from the Pantry

Lia Soneson

1Pasta2020_v2_01 copy.jpg

A good pasta dish transforms everyday, pantry ingredients into something extraordinary for any day of the week. IN THIS ISSUE, we present three of our easiest to implement pasta dishes that deliver big on flavor and satisfaction! Buon appetito!

A Good Time to Have Brunch In!

Lia Soneson

Brunch2020_v3_01.jpg

There is no better time than the present to brunch . . . IN! If breakfast is the most important meal of the day, brunch is the most fun! Brunch implies a leisurely sort of day — where our schedules are less relentless and time together is well spent. Whether you spend it with family or a few good friends, we've composed a foolproof menu worth celebrating.

IN THIS ISSUE, we feature a Caramelized Onion, Mushroom, and Parmesan Quiche, Macerated Citrus Salad, and a side of Orange Poppyseed Bread.

Entertain with these Easy Appetizers!

Lia Soneson

Appetizers_v1_01.jpg

YOU'RE IN THE MOOD FOR A PARTY -- WE ARE, TOO! We love this season because it is filled with family and friends, and plenty of good times. Whether you're the party host, or bringing something to a get-together, this issue features three easy appetizer recipes - all delicious!
Our Best to You this Festive Season!

Entree-Worthy Summer Salads

Lia Soneson

3 Entree-Worthy Summer Salads for You to Enjoy!
Summer Salads
Recipes
Olivelle
Lodge
Facebook

Products
recipeone
Summer Salads
Summer Salads
Summer Salads
Summer Salads
recipetwo
Summer Salads
Summer Salads
recipethree
Summer Salads
Summer Salads
Summer Salads
Summer Salads
Header