Contact Us

Use the form on the right to contact us.

You can edit the text in this area, and change where the contact form on the right submits to, by entering edit mode using the modes on the bottom right. 

367 North Main Street
Milford Charter Township, MI, 48381

248.684.1373

Acorn Farm opened its doors in downtown Millford in 2008. Since then, we’ve had the pleasure of meeting the most kind, interesting, generous, and downright fun people in the store every single day. Our staff is made up of former customers who became a part of our family so much that we just had to hire them! At Acorn Farm our goal is to not only provide you with high quality goods for your kitchen and home, but to stir up your imagination in the kitchen and around the home. We aim to make every trip to Acorn Farm a pleasant one, and that you’ll always leave encouraged, inspired, and ready to try something new.  

RECIPE ARCHIVE IV

Filtering by Tag: zest

Key Lime Pie

Lia Soneson

Key_Lime_Pie_v2_01.jpg

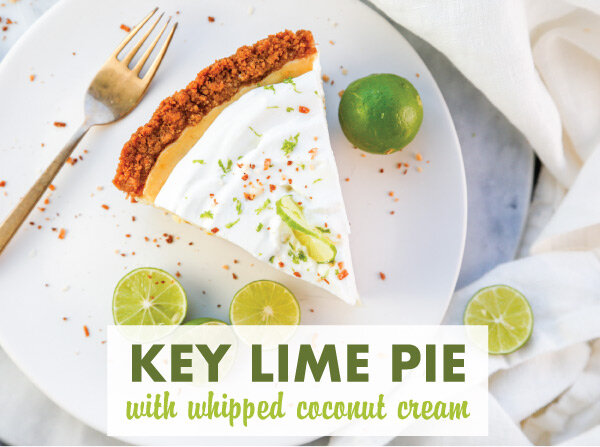
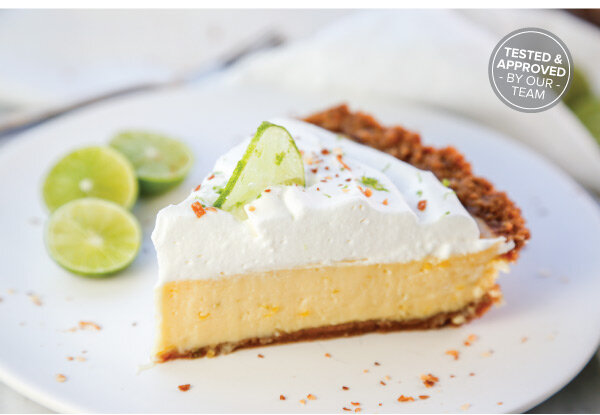
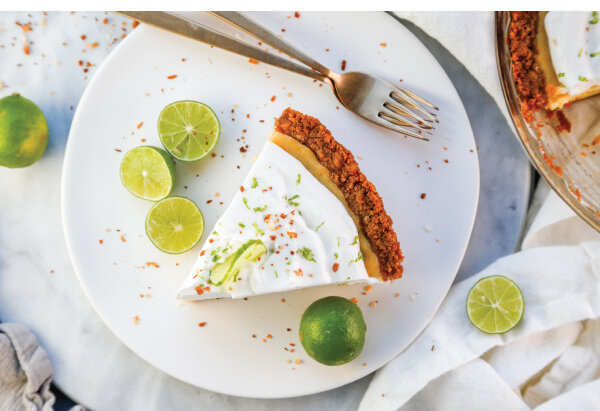
A true summer classic, tart and sweet Key Lime Pie is one of our favorite desserts! For our version, we’ve used a classic graham cracker crust filled with a surprisingly simple custard made of key lime juice, key lime zest, eggs, and sweetened condensed milk. The creamy, smooth filling is topped with a generous amount of whipped coconut cream to double down on the tropical flavors of this wonderful treat.

Key Lime Pie with Whipped Coconut Cream
Makes one 9" pie

Pie Filling:
2 cans (14 oz each sweetened condensed milk
7 large egg yolks, beaten
3/4 cup freshly squeezed key lime juice
1 tablespoon key lime zest

Coconut Whipped Cream:
1 cup cold whipping cream
1/3 cup coconut cream
1/4 cup powdered sugar
1 teaspoon vanilla extract

Toasted Coconut Graham Cracker Crust:
1 -1/4 cup graham cracker crumbs
2 tablespoons sweetened coconut flakes, toasted
2 tablespoons granulated sugar
1 tablespoon brown sugar
6 tablespoons butter, melted
Pinch of salt

Garnish:
Key lime zest, lime slices, and/or toasted coconut

Directions:
1. Prepare the key lime pie filling by whisking together the sweetened condensed milk, egg yolks, key lime juice, and key lime zest until smooth. Cover with plastic wrap and let the mixture rest and thicken at room temperature for about 20 minutes.

2. Meanwhile, preheat the oven to 325° F. In a food processor, pulse the graham crackers and toasted coconut flakes until they are ground into fine crumbs. Pour the crumb mixture into a medium bowl and stir in the sugar and salt until evenly incorporated. Add the butter and mix the ingredients until they are fully incorporated. The mixture will be slightly wet and sandy. Press the mixture into the bottom and sides of a greased pie pan. Bake in the preheated oven for 12 minutes. Remove and cool the pie crust slightly on a cooling rack.

3. Pour the filling into the warm crust and bake the pie until set, about 25-35 minutes, until pie is firm to the touch but the center is slightly jiggly (it will continue to set as it cools). Cool on a cooling rack for 1-2 hours and then refrigerate for an additional 2 hours or overnight.

4. Once the pie has chilled, prepare the coconut whipped cream. In a stand mixer with the whisk attachment, pour the cold whipping cream, coconut cream, powdered sugar, and vanilla extract into a chilled bowl, and beat on high until stiff peaks form, about 3 minutes. Top the key lime pie with the whipped cream, lime slices, lime zest, and toasted coconut. Serve immediately.

Pea Pesto Pasta

Lia Soneson

Pea_Pesto_v2_01a.jpg

A good pasta dish can transform everyday ingredients into something extraordinary any day of the week. Springtime flavors inspire this fresh take on pasta. We think your family will love this super-quick, spring pea pesto pasta dish. Buon appetito!

Spring Pea Pesto Pasta
Serves 4

Spring Pea Pesto Ingredients:
1/2 cup frozen peas
1/4 cup Parmesan cheese
1/2 teaspoon Kosher salt
1/4 teaspoon freshly ground black pepper
1/4 teaspoon crushed red pepper flakes
1/2 cup olive oil
1/2 cup packed fresh basil leaves
1 tablespoon packed fresh mint leaves
juice of 1/2 lemon (about 2 tablespoons)
1 small clove fresh garlic

Pasta:
1 lb thin spaghetti

Garnish:
1 pint Sun Gold tomatoes, halved
8 oz burrata cheese
Mint leaves, chiffonade
Basil leaves, chiffonade
Lemon zest

Directions:
1. Gather all of the pesto ingredients together. Be sure to thoroughly wash all of the fresh herbs! Pulse the pesto ingredients together in a food processor. Taste test the pesto, and adjust the salt and pepper accordingly. If needed, add more olive oil for a thinner consistency. Enjoy pesto immediately, or keep covered and refrigerated (or even frozen) until ready to use.

2. Slice the tomatoes in half with a small paring knife. Roll the basil and mint leaves and cut in a chiffonade cut for a garnish.

3. Cook the pasta according to the package instructions. Drain, reserve about 1 cup of the pasta cooking water. For better pasta, salt the water! The cooking water should be “like the sea” – start with about 1 teaspoon coarse kosher salt per quart of water. This seems like a lot of salt, and it is, but most of this will be discarded when the pasta is drained. Test the pasta frequently as it approaches completion. Pasta should be cooked to al dente – “to the tooth” – tender, yet chewy, not at all mushy. The easiest way to check for doneness, is to remove a piece of pasta and test between your teeth. Or, cut a piece of test pasta, and check the cross section view. The smallest white dot, or white line at the center of the pasta piece indicates doneness is nearly at hand.

4. Mix the pesto with the drained and cooked pasta, stir with tongs until the pasta is well-coated with the pesto. Add reserved pasta water, to thin the sauce, if needed. 5. Garnish the pasta with the tomato halves, pieces of fresh burrata, mint, and basil leaves. Enjoy!

Chocolate Orange Holiday Cookies

Lia Soneson

The flavors of chocolate and orange are a classic holiday duo for well-deserved reasons! In this recipe, rich dark chocolate is paired with light and bright citrus, resulting in a cookie that tastes so sophisticated, you’ll be happy you if you chose to make a double batch!

Chocolate Orange Cookies - Slice & Bake
Makes about 24 cookies

Ingredients:
1 cup unsalted butter, softened
1/2 cup light brown sugar, packed
1-1/4 cups granulated sugar
1 large egg, room temperature
1 teaspoon pure almond extract
1 teaspoon freshly squeezed orange juice
2-1/4 cups all purpose flour
1/4 teaspoon salt
1/4 teaspoon cardamom
1 tablespoon orange zest (about 1 medium orange)
4 oz dark chocolate chunks, finely chopped, plus
16 oz dark chocolate chunks for melting
Coarse sugar for rolling, (such as sugar in the raw)
Flake sea salt Additional orange zest for sprinkling

Directions:
1. In a stand mixer with a paddle attachment, beat the butter on medium speed until smooth. Add the sugars and beat on medium until light and fluffy. Add the egg and almond extract and beat on high speed until the ingredients are fully combined, roughly 5 minutes. Scrape down the sides and the bottom of the bowl with a spatula as needed. Add the orange juice and continue mixing for another minute.

2. Sift the flour in a separate bowl and mix in the salt and cardamom. Slowly add the dry ingredients to the wet ingredients 1/2 cup at a time, mixing on low speed until fully incorporated. Fold in the orange zest and the 4 oz of finely chopped chocolate until evenly distributed. Gather and remove the dough from the mixer.

3. On a floured surface, divide the dough in half. Roll each half into a log, about 2-1/2 inches in diameter, and wrap in plastic wrap. Completely chill the dough (for at least 2 hrs, or for up to 1 week).

4. When ready to bake, preheat the oven to 350°F. Remove one of the dough logs from the refrigerator. Roll the logs in the coarse sugar and use a sharp, serrated knife to slice the log into individual rounds, roughly 1/2" thick. Place the cookies on a large cookie sheet, roughly 2" apart and bake for 12 minutes, or until the edges of cookies are just starting to brown. Cool on the cookie sheet for 2 minutes, then transfer to a cooling rack.

5. While the cookies are cooling, melt 16 oz of chocolate in a double boiler or in the microwave (careful not to burn the chocolate if microwaving!). Dip each cookie halfway into the chocolate to coat one half, and place the half-coated cookie on a parchment paper, or a silicone-lined baking sheet. While the chocolate is still warm, sprinkle the cookies with the flake salt and orange zest. Place the baking sheet in the refrigerator for about 30 minutes to allow the chocolate set.

Store the cookies in the refrigerator to ensure the chocolate stays set.